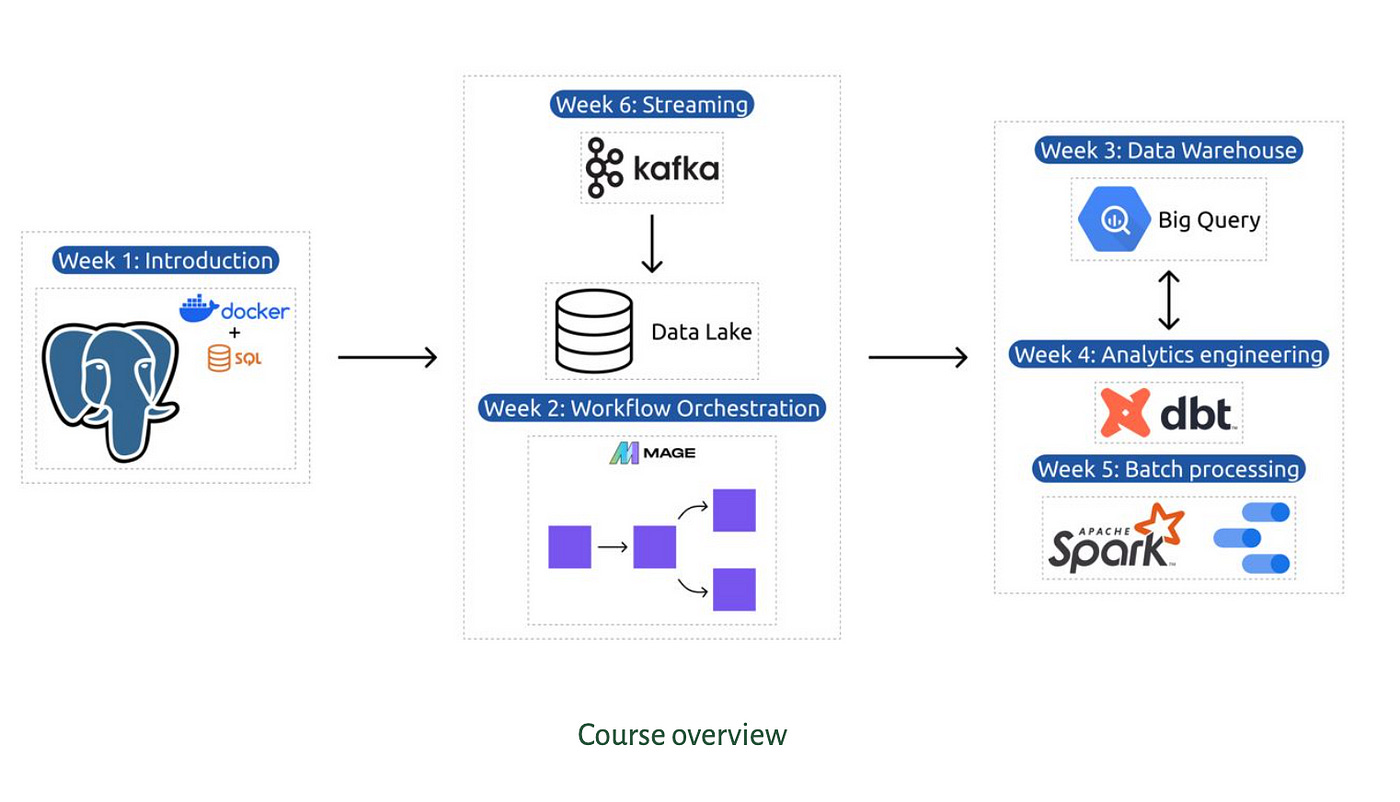
Introduction
Organized by DataTalks.Club and curated by Alexey Grigorev, this free annual camp offers valuable insights, a certification, and a community for data enthusiasts. It’s an excellent opportunity to enhance your skills and network with like-minded professionals.
The first week of the DataTalksClub Data Engineering Zoomcamp’s content revolves around the New York Taxi dataset. This dataset is a fact table containing details about taxi trips, such as trip length, amount, pickup and dropoff locations, dates, etc. Our goal is to set up an environment that allows us to ingest and store this data for later analysis.
Registration Link for Zoomcamp
If you’re interested in the Zoomcamp, you can register here, and it’s free to participate!
Setting Up Your Mac Development Environment
First things first, let’s equip your Mac with the essential tools for data engineering. We’ll be using Visual Studio Code, Python, and Docker to create a robust development environment.
Here’s what you need to download and install:
- Visual Studio Code - A versatile code editor with excellent support for data engineering tasks.
- Python - The programming language we’ll use for data manipulation and analysis.
- Docker - For creating and managing our containerized applications.
Note for Apple Silicon users: Be sure to download the ARM64 version of Docker for optimal performance on M1/M2 chips.
Containerization with Docker
Docker allows us to create consistent, portable environments for our applications. It’s particularly useful for ensuring that our database and other dependencies are easily set up and managed.
Let’s set up our PostgreSQL database and pgAdmin using Docker Compose. Create a docker-compose.yml file with the following content:
services:
  pgdatabase:
    image: postgres:13
    environment:
      - POSTGRES_USER=root
      - POSTGRES_PASSWORD=root
      - POSTGRES_DB=ny_taxi
    volumes:
      - "./ny_taxi_postgres_data:/var/lib/postgresql/data:rw"
    ports:
      - "5432:5432"
  pgadmin:
    image: dpage/pgadmin4
    environment:
      - PGADMIN_DEFAULT_EMAIL=admin@admin.com
      - PGADMIN_DEFAULT_PASSWORD=root
    volumes:
      - "./pgadmin_data:/var/lib/pgadmin:rw"
    ports:
      - "8080:80"
With a simple docker-compose up command, you’ll have a PostgreSQL database and pgAdmin ready to go.
Data Manipulation with Python, Pyarrow and Pandas
Now that our environment is set up, let’s look at how we can use Python, Pyarrow and Pandas to import data into PostgreSQL
Here’s a sample script for data ingestion:
import pandas as pd
import pyarrow.parquet as pq
from sqlalchemy import create_engine
from time import time
import argparse
import os

def extract(file_path):
    if not os.path.exists(file_path):
        raise FileNotFoundError(f"The file {file_path} does not exist.")
    return pq.ParquetFile(file_path)

def transform(parquet_file):
    return parquet_file.schema.names

def load(parquet_file, columns, engine, table_name):
    start_time = time()
    num_row_groups = parquet_file.num_row_groups

    for i in range(num_row_groups):
        chunk = parquet_file.read_row_group(i, columns=columns)
        df_chunk = chunk.to_pandas()
        df_chunk.to_sql(name=table_name, con=engine, if_exists='append', index=False)
        print(f"Inserted row group {i + 1} of {num_row_groups}")

    end_time = time()
    print(f"Ingestion completed. Total time: {end_time - start_time:.2f} seconds")

def create_table_schema(engine, table_name, parquet_file):
    df_sample = pd.read_parquet(parquet_file, engine='pyarrow').head(0)
    df_sample.to_sql(name=table_name, con=engine, if_exists='replace', index=False)

def main(params):
    connection_string = f'postgresql://{params.user}:{params.password}@{params.host}:{params.port}/{params.db}'
    engine = create_engine(connection_string)

    parquet_file = extract(params.parquet_file)
    columns = transform(parquet_file)
    create_table_schema(engine, params.table_name, params.parquet_file)
    load(parquet_file, columns, engine, params.table_name)

if __name__ == '__main__':
    parser = argparse.ArgumentParser(description='Ingest Parquet data to Postgres')
    parser.add_argument('--user', help='Database user')
    parser.add_argument('--password', help='Database password')
    parser.add_argument('--host', help='Database host')
    parser.add_argument('--port', help='Database port')
    parser.add_argument('--db', help='Database name')
    parser.add_argument('--table_name', help='Name of the table to write results to')
    parser.add_argument('--parquet_file', help='Path to the Parquet file')

    args = parser.parse_args()
    main(args)
SQL Practice
We also had the opportunity to practice our SQL skills with some challenging queries. Here’s an example of a query we worked on:
-- Find the day with the highest number of taxi trips
SELECT DATE(pickup_datetime) as busiest_day, COUNT(*) as trip_count
FROM yellow_taxi_data
GROUP BY busiest_day
ORDER BY trip_count DESC
LIMIT 1;
Introduction to Google Cloud Platform (GCP)
As part of our journey into cloud computing, we set up Google Cloud Platform accounts. GCP offers a wide range of services that are invaluable for data engineering projects.
Infrastructure as a Code with Terraform
We also explored Terraform, a tool for managing infrastructure as code. This allows us to create and manage cloud resources efficiently. Here’s a sample Terraform configuration:
main.tf file:
terraform {
  required_providers {
    google = {
      source  = "hashicorp/google"
      version = "5.6.0"
    }
  }
}

provider "google" {
  credentials = file(var.credentials)
  project     = var.project
  region      = var.region
}

resource "google_storage_bucket" "demo_bucket" {
  name          = var.gcs_bucket_name
  location      = var.location
  force_destroy = true

  lifecycle_rule {
    condition {
      age = 1
    }
    action {
      type = "AbortIncompleteMultipartUpload"
    }
  }
}

resource "google_bigquery_dataset" "demo_dataset" {
  dataset_id = var.bq_dataset_name
  location   = var.location
}
variables.tf file:
variable "credentials" {
  description = "My Credentials"
  default     = "numeric-marker-435404-m9-2a317d4c3e6d.json"
  #ex: if you have a directory where this file is called keys with your service account json file
  #saved there as my-creds.json you could use default = "./keys/my-creds.json"
}

variable "project" {
  description = "Project"
  default     = "numeric-marker-435404-m9"
}

variable "region" {
  description = "Region"
  #Update the below to your desired region
  default     = "us-west1"
}

variable "location" {
  description = "Project Location"
  #Update the below to your desired location
  default     = "US"
}

variable "bq_dataset_name" {
  description = "My BigQuery Dataset Name"
  #Update the below to what you want your dataset to be called
  default     = "demo_dataset_123456789"
}

variable "gcs_bucket_name" {
  description = "My Storage Bucket Name"
  #Update the below to a unique bucket name
  default     = "terraform-demo-terra-bucket_123456789"
}

variable "gcs_storage_class" {
  description = "Bucket Storage Class"
  default     = "STANDARD"
}
Looking Ahead
As we wrap up Week 1, we’re looking forward to Week 2, where we’ll explore workflow orchestration with Mage.AI. The journey into data engineering is just beginning, and there’s much more to learn and discover.
Remember, in data engineering, every challenge is an opportunity to learn something new. Stay curious, keep practicing, and don’t hesitate to ask questions!